It is not uncommon for paddlers to own more than one kayak.
Paddling singly alongside a partner is fun and relaxing. This post is for you if you are concerned about the safe storage of your kayaks.
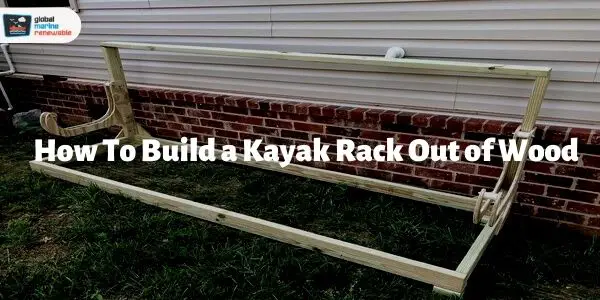
How to Build a Kayak Rack Out of Wood The Basics
Pre-made kayak racks are quite expensive, and they may not match the size and shape of your kayaks.
This is where a DIY wooden table-design kayak rack comes into the picture. It is easy to construct with the right raw materials and tools.
However, if you ever need to buy a new kayak or kayak paddles, then read our kayak and kayak paddle reviews of different price ranges:
- Best Fishing Kayak Under 1000 Dollars
- Best Fishing Kayak Under 800 Dollars
- Best Fishing Kayak Under 300 Dollars
- Best Kayak Paddle Under $100
Equipment Needed to Build a Kayak Rack Out of Wood
| Sr No | Equipment/Tools | No of Units | Cost (US Dollars) |
| 1 | Portable Clamping System | 1 | 200 |
| 2 | Circular Saw | 1 | 150 |
| 3 | Stand Plans | 1 | 10 |
| 4 | Hammer Drill | 1 | 50 |
| 5 | High-Density Foam (1-inch thickness) | 1 | 10 |
| 6 | Square-cut Logs (4-feet long and 4-inch wide) | 3 | 80 |
| 7 | Plywood(10-feet x 5-feet) | 1 | 20 |
| Total: | 6 | 590 |
How to Build a Kayak Rack Out of Wood: Step-By-Step Instructions
A two-story kayak rack is nothing but a six-legged table placed on its side. You can use the lower rung for setting fishing equipment such as a cooler, fishing rods, lures, awning, etc. The first and second rung can be utilized for storing the kayaks.
You can place this DIY kayak rack in your garage, porch area, or in a backyard. You can use a sheet of the canvas (awning) to keep the sun and rain off your investment.
Lastly, you can always use a smart 3D modeling software to visualize your creation. AutoCAD is quite popular.
Step 1:
To begin constructing the DIY kayak rack, have the portable clamping system ready. You can set your makeshift workshop in the basement, backyard, or a spare room in your home.
Step 2:
Place the 4-feel square-shaped log of wood on the clamper and make a mark in the center. Cut the log in two equal parts with a circular saw.
Do the same with the other two logs. Once the task of cutting is finished, you will have a total of six legs.
Step 3:
For the backrest of the kayak rack, I would suggest getting a 10-feet x 5-feet plywood. Smoothen up the rough edges with the circular saw.
Step 4:
Next, lay the plywood flat on the ground. Mark a total of six dots—four on the corner of the plywood and two on the sash.
Step 5:
Place them on the portable clamping system. Take the hammer drill and fasten the 2-feet legs on each of the dots.
Ensure the ones in the lower rung do not have any gap between them and the outer edge of the plywood.
Step 6:
Finally, cut the foam into six 10-inch x 5-inch rectangles. Glue each of the pieces on the top portion of the leg. The high-density foam will act as a cushion for your kayak.
Also Read:
Build a Kayak Rack Out of Wood – Summary
There is no shortage of innovative designs in the pre-made kayak market.
However, most of them are high-priced. The wooden table-design kayak rack may not look glamorous, but it is easy-to-construct and does not require costly raw materials.
How to Build a Kayak Rack Out of Wood Final Words
To save even more money, you can search for spare wooden logs for cheap on sites like Craigslist. Just make sure the wood is decent quality and not termite infested.
You can also read our guide on kayak & canoe safety equipment and building a kayak.